Create an E-mail on Demand account
To create an E-mail on Demand account (EOD), it is necessary to have a POP3-Account. If you, for example, want to create an EOD for the e-mail address [email protected], you need to know how to access this mailbox. The following information is needed:
- POP3 Username
- POP3 Password
- POP3 Hostname or IP-Address
To create an EOD, open the menu item “E-mail on Demand --> Create e-mail on demand.” This will open the following input mask:
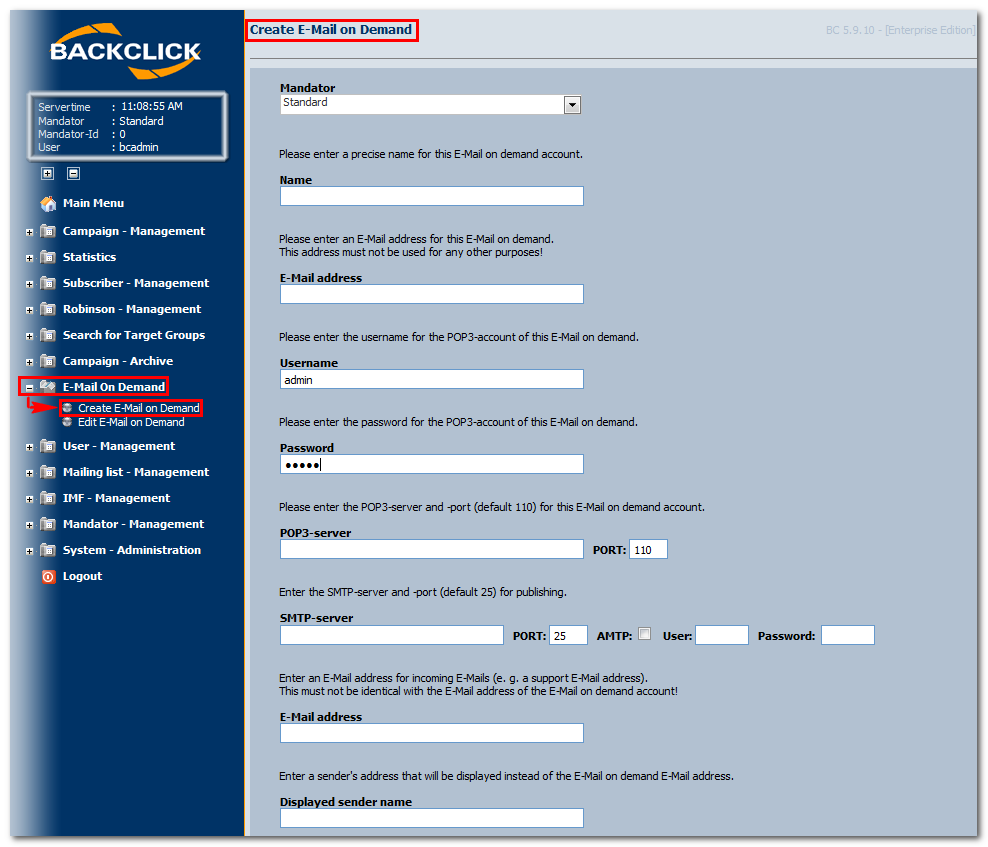
Abb. 14.1.1 - Neuen Email on Demand Account anlegen
Account-Name
Enter a name for this E-mail on Demand account here. This name is to be used internally and for labeling (e. g. Productinfo Product1).
E-mail on Demand address (sender address)
An existing e-mail address is to be entered here. PLEASE NOTE: BACKCLICK will NOT create this mailbox for you. You have to define a real POP3 account on your e-mail server for this e-mail address. Make sure that this e-mail address is not used as a sender address for another newsletter or E-mail on Demand account (e.g., [email protected]).
User name
To get the e-mail of the POP3 account named above, the POP3 server needs a user name and a password. Enter the user
name here for the E-mail on Demand account (e.g., product1).
Password
Enter the password for the user name you entered above.
POP3- and SMTP-Server
Enter the POP3 (incoming mail) and the SMTP (outgoing mail) server into these two input boxes. Do not forget to enter the
port of the E-mail on Demand account. You may either use host names or IP addresses (e.g., pop.company.com).
E-Mail Address
Enter the e-mail address that incoming requests should be passed to. This can be the sales department, the marketing
department, or the IT department of a company (e.g., [email protected]).
Sending name
You may enter a sending name for the E-mail on Demand account. Later on, this will be displayed instead of the e-mail
address in Outlook Express and other e-mail clients (as, for example, Product1).
Subject Line
Enter the subject here. This text will be displayed in the subject line of every e-mail client (e.g., “30% off Product1!”).
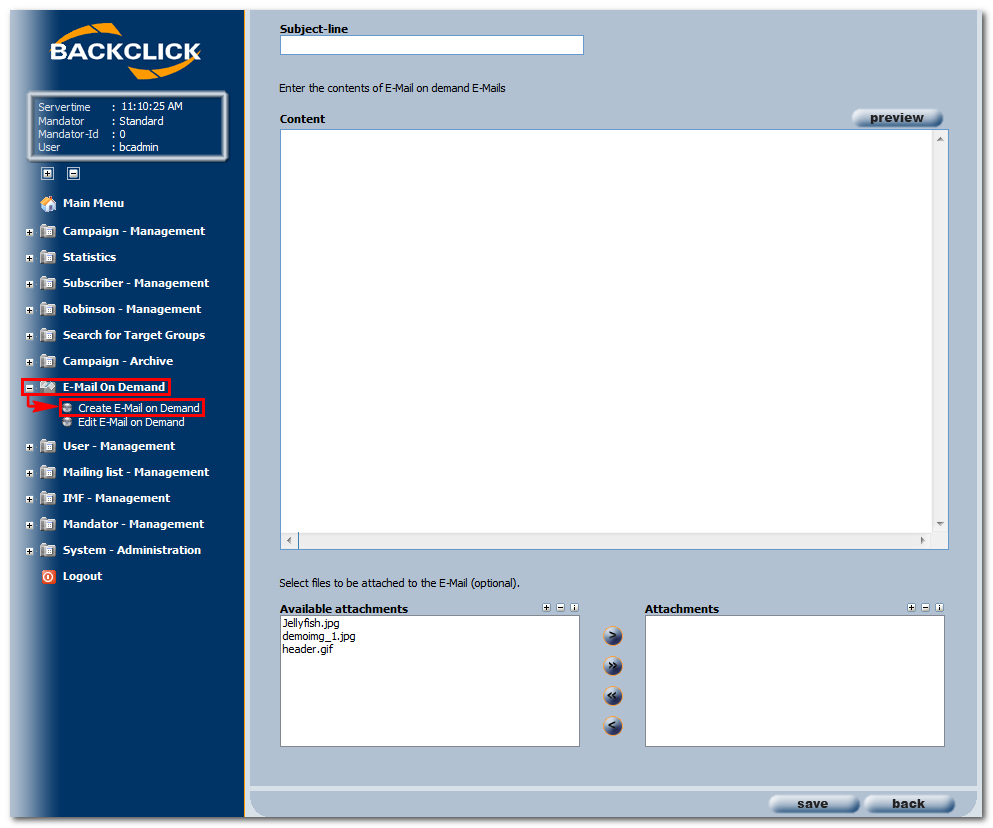
Abb. 14.1.2 - Neuen Email on Demand Account anlegen
Content
Enter the content of the e-mail here. It is possible to enter real text as well as HTML codes. Be sure to follow the conventions of e-mail HTML if you use HTML. Not every e-mail client is able to execute JavaScript, or display CSS in the right way. Limit yourself to HTML 4.0, while keeping e-mail-client compatibility in mind.
Attachments
Select the attachment that should be sent with the e-mail on demand from the multiple select box. To add more attachments to the server, select the menu item “Newsletter editorial staff -> Management of Attachments.” You may upload as many files as needed (e.g., information on products in PDF form).
Inbound Images
BACKCLICK offers lets you send images within an inbound HTML e-mail. This means that the subscribers can view the images whenever they like, even if they are not on line. Most of these images will be linked to the World Wide Web directly via HTML code. To send the images as inbound, the links should be written like this:
<img src=”http://backclick.business.com/images/spacer.gif”>
BACKCLICK will automatically download the images from the World Wide Web, and code them inline. You just need to make sure that the URLs of the images, written into the source code, are the right ones. Try the preview ("Preview") to check.
Bear in mind that inline images make the e-mail larger, and result in a longer downloading time. That is why the default value is set on “deactivated.”